Unit 52, 3D animation

Maya: Blocking Sheet

Blocking sheet.png

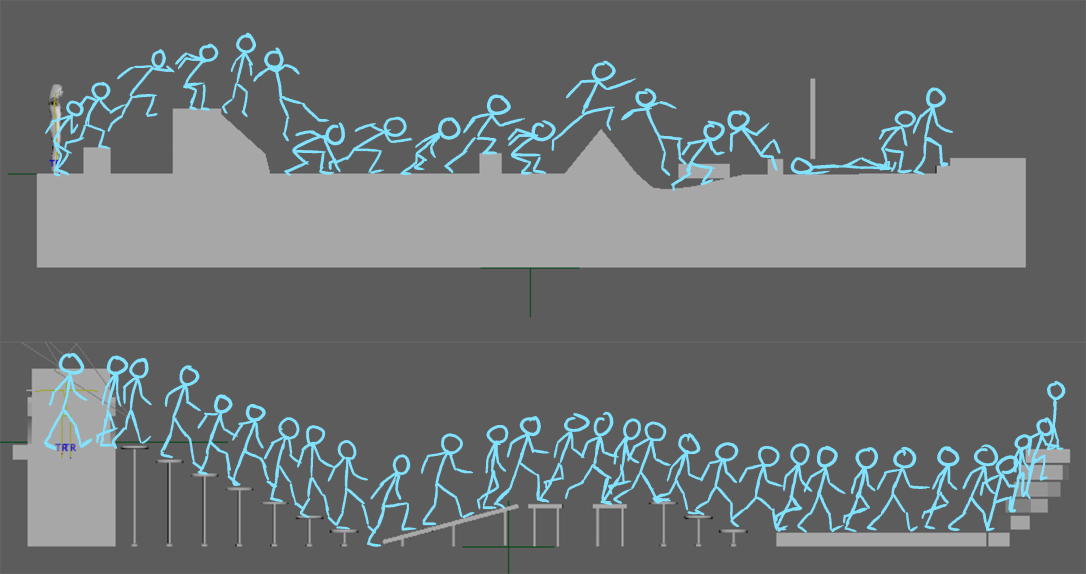
Here you can see my Blocking Sheet to prepare myself for animating the obstacle course. What this will help me with is the posing for the majority of the frames for the 3D model I’ll be using in Maya. The stickmen represent the model and are meant to give me an idea of what the poses should look like. This will help me later as I will probably use some exaggeration when animating the character. Some key Animation Principles I’d have to consider will be:

  • Arc: For getting smooth movement, possibly useful for the arcs of the jumps.
  • Timing: To get the timing of each movement right, mainly for the running and going through the obstacles.
  • Anticipation: Also useful for the jumps, specifically, preparing for the jump.
  • Straight ahead action (Or pose to pose): To get the poses for the movements. Though I will probably be animating Straight Ahead as it’s my preferred method.
  • Exaggeration: I plan for my characters movements to be exaggerated to give it more life.

My plan is to have the animation last at least 30 seconds. Despite this goal, I also want my character to be running throughout the whole obstacle course which I fear will reduce the time the animation will take, which is why I made him walk around the second half of the obstacle course. This will be an interesting challenge as a whole because of the slightly more advanced movements I will have to achieve, however, with reference footage, I feel like I can achieve that.

Unit 52, 3D animation

Maya: Obstacle Course Review

Our task was to animate the character we generated from the Maya website going through an obstacle course. This feat alone was enough to make me wonder if I was going to be able to do it. Nonetheless, I was still excited to do it as the better the quality, the more it drives me to animate.

To start off I had the character run and jump from the box onto the ramp. This part wasn’t very difficult for me and I feel is the best-looking part of the obstacle course seeing as it’s the start. I originally planned to have it climb up the ramp instead but I figured it wouldn’t look as good. The motion is smooth though I feel the positioning of the pelvis, which is altering the position of the whole body, could have been adjusted better so it looks more fluid. Alongside this, I would have liked to improve on the landing of the jump as it looks like his feet are being dragged down as opposed to falling.

Then we had the run towards the first corner of the obstacle course. The running, in my opinion, was quite linear and maybe too quick which demotivated me a little, but didn’t stop me. This was due to the fact that I rushed this section as I worried for time. The jump over the second ramp I feel was a little linear and odd too. It was originally going to be a front flip to make things look fancy but animating that was a little buggy as the feet would move weirdly when I tried, so I decided a simple jump was better. And as for the slide under the wall, I actually think that part turned out better than expected, like the motion when jumping and sliding. It’s a little unrealistic but that doesn’t bug me as much. What does bug me, however, is the transition from getting up from the jump, I feel it looks unnatural and stiff. But I don’t mind the walk that comes after it, though even that can be improved.

Lastly the corner to the end. Because I struggled for time, I made the last part quick. I don’t mind the walking down the steps as it looks good from the side, but from the front, it looks iffy and weird, probably due to it slightly being rushed. Once he reaches the bottom of the staircase he prepares for a long jump, then actually jumps to the end. He does this because I needed the animation complete soon.

In conclusion, I would have liked to spend more time on the animation, however, the file won’t open at home which makes my life a little harder. The obstacle course turned out good enough but I really would have liked to have done better on the motion of the character, I feel like they are too linear in most places, though my intention was to kind of exaggerate the characters movements. And of course, I would have liked to finish the obstacle course properly but, from what I have I feel it will suffice. This obstacle course felt rushed but I’m still decently happy with the result.

Reference Video’s

Unit 52, 3D animation

Maya: Pixar short film

Story

This short is about a ball of yarn named purl who has her first day on the job at an office. As Purl notices and enjoys the workplace environment, she expects to fit in with everyone and become friends right away. But Purl then notices it’s not as easy as she thinks and thinks she must change to fit in. Eventually, after losing hope of fitting in by being ignored and avoided, Purl comes up with the idea of changing personality and appearance, the end result turned out as expected as she now is a staple in the offices. Just as Purl feels accepted and goes on a break with her colleagues, a new member who is also a ball of yarn named Lacey joins the office and goes through the same feelings Purl did. Purl notices and decides if she wants to introduce herself to Lacey or hang out with her colleagues. She decides to introduce Lacey to herself and her colleagues too so she feels accepted. Later it is shown that because of this, the workplace has become a more widely acceptable place for all kinds of people. From an all suited men’s workplace to a diverse group of friendly workers.

Job Roles

The kind of job roles included to make this short are as follows:

  • Concept artists: To give an overall design theme by coming up with the aesthetic of everything.
  • Animators: To give the characters and objects life by giving them motion.
  • Story Writers: Self-explanatory, to tell the story, which people can understand.
  • 3D modellers: To turn the characters into 3D models to fit the environment.
  • Lighting artist: To light the scene, also determining the mood of the scene with light.
  • Texture artists: Create’s textures and colours on various 3D objects such as skin or clothing material.

Programmes and Art Style

A variety of programmes are used to create these shorts, some of them being Renderman (For rendering), Maya (For modelling) and Presto (For animating). Funnily enough, Presto is very similar to Source Filmmaker, in terms of functions and design, though presto is more powerful and is bug-free. Unlike other animation apps, presto uses sliders to move certain bones as opposed to selecting them and moving them manually.  The art style for this short is entirely 3D based. It has done the job of exaggerating on the style of realism so it looks more upbeat. I like how the short does a good job of mixing a cartoon looking character with a more realistic environment. The style of Purl is also a nice design choice as, because of her look, she is a more likeable character. Her extreme facial expressions compared to the workers emphasise this as it makes us have sympathy for here. This art style also helps attract and fit a younger audience.

Lighting and Rendering

In terms of lighting, the lighting is very appealing and realistic and consistent throughout the whole short. Though they could have used lighting in a way to convey emotion in some areas. This lighting fits in with the realistic style the short is trying to represent. Rendering these frames can take a very long time, from 5 to 7 hours, which is why Pixar render each frame on different machines to speed up the process.

Animation

The animation is quite different depending on the character and is very noticeable too. You have the suited workers whose movements are very realistic, to a point where it looks Motion Captured. Then you compare this with Purl who is very different from the others as her animation is exaggerated and at times blocky, which emphasises her character and look.

Conclusion

To conclude, this has to be one of my favourite Pixar shorts. I really do like the moral it’s trying to convey which would be to accept everyone, no matter how they are and to not be prejudice. The art clash between realistic and cartoony is another touch up I really like too and how it works so well together both aesthetically and as a story emphasis.

Unit 52, 3D animation

Maya: Modelling

In today’s lesson, our objective was to find an object of our choosing via an image, and 3d model the same object in Maya. To start this off, I needed a reference picture, so I got my reference and I was able to put in in the programme so I could easily model in front of the image to get the exact shape I needed.

Then the usual thing to do would be to spawn a cube, subdivide it and delete one half of the cube. By subdividing it, it creates these lines which have points at each corner, known as vertexes. I can move these vertexes to manipulate and bend (also known as extruding) the shape. So I followed this step and created the gem of a necklace from an anime I watch.

maya_2019-03-24_11-10-30.png

maya_2019-02-17_14-39-47.png

Next, I followed the same steps to create half of the iron base of the necklace once I did one half, I duplicated it, flipped it and merged them together so it looks like one. Alongside this, I also duplicated the gem and enlarged it so it could act as a small frame for the gem. Creating the base was quite difficult to get accurate as the shape was pretty unusual compared to something simple like the gem. Nonetheless, I still managed to recreate it fine. The problem I have however is the top part as it doesn’t smoothly fit as there is a small pinch in there. But it’s not as noticeable from far.

maya_2019-02-17_14-46-24.png

Finally, it was time to add the smaller gems. These were simple as most of them were small spheres squashed down. The diamond looking ones required a cube to be adjusted to create them. I used a cube to make a fourth of the diamond shape and duplicated it to fully make the shape. I decided to leave out the extra details on the necklace as that would be too difficult.

2019-02-17_14-29-46.png

In conclusion, this wasn’t as hard as I expected it to be. The process was tedious and confusing, but once I got the hang of things it sped up. This has given me a good insight on how to do this again in the future.

Unit 52, 3D animation

Maya: Mixamo

In today’s lesson, we were introduced to a website called Mixamo. It is a site that contains a whole load of preset animations for you to use on your character. Our job today was to import one of them and put it onto the character we made of ourselves. The cool thing about these presets is that they are compatible with the unreal engine, so they work within the engine. Heres an example.

2019-03-24_14-21-16.gif

There were also options to adjust the current animation, however, I didn’t feel the need to use them as I was happy with the way it looked.

chrome_2019-03-24_14-22-16.png

The process was fairly simple. Download the animation file and import it to Maya with a few clicks. However, I decided to be a little extra and animate the character my self. I had it strike a pose for a second as a test to see if the character worked well. All of the animations were done in the Graph Editor. I do like the quality of the animation I did as it has the fluid motion I was looking for with that slight realism. It’s not as good as the Mixamo animations, but those were been made with motion capture, so it’s as expected.

2019-02-17_15-04-01.gif